USB Reverse Tethering No Root No ADB Android (all versions) & Windows 10
- Obtener enlace
- X
- Correo electrónico
- Otras aplicaciones
USB Reverse Tethering No Root No ADB Android (all versions) & Windows 10
This guide allows you to share the Internet connection of a Windows 10 PC with your Android device via a common USB cable that is also charging your phone. This is useful if you can not or want to use the WIFI on your smartphone and you do not want to consume traffic from your data plan. A good reason to limit the use of wireless connections on your phone is the electromagnetic pollution hitting your body. But that's another story.
The important thing about this guide is that it is not required that your phone is rooted. Then, I repeat it, all works without Rooting your precious smartphone. Unfortunately, this involves that some apps (but not the most important) require the fictitious use of the data connection at least, because you can not install Xposed modules to workaround the stupid limitations of these apps. But this is the lesser evil. Moreover this guide will also work with Android versions from Lollipop onwards.
This guide requires only the built-in Android usb tethering function and a Windows 10 PC and so it works on all Android versions without even the need to install ADB (Android Debug Bridge) on Windows. It uses the free open-source "openvpn" program for Android and Windows. The only limitation is that it only works for a single Android device at a time.
SETUP
Download "openvpn for Windows" from here or from below. Double click on the file you’ve just downloaded to start installation and confirm the Windows security messages.
Make sure all the components are selected during the installation process.

Click on "Install" again when a message appears as this:

Now you can find “OpenVPN GUI” on the desktop. Right click on “OpenVPN GUI” and go to “Properties”. Go to “Compatibility” tab and make sure in Privilege Level “Run this program as administrator” is selected. Click “Apply” then “OK” and close the window.
Search "Generate a static OpenVPN key" among the installed programs (Start menu --> All apps), right-click on it and "run as adminstrator", then press OK when a black command prompt window appears.
Download the "android.ovpn" file from below:
and copy it in "C:\Program Files\OpenVPN\config".
Now Double click on "OpenVPN GUI" on your desktop to start the program.

Right click on Start menu Windows flag (left bottom corner on the desktop) and select "Network connections" (or if you prefer, right click on the small Monitor icon in system tray and open "Open Network and Sharing Center", then on the left of the new opened window go to "change adapter settings"). Then select the network card that you are using for connecting to Internet and right click on it and open "Properties". Go to "Sharing" tab, select "Allow other network users to connect through this computer's Internet connection" and choose under "Home networking connection" the network adapter name that corresponds to the "TAP-Windows adapter" as you can see in "Network Connections" that you get access as above.
Go to "C:\Program Files\OpenVPN\config", open the file "key.txt" and copy all text in it.
Dowload the "smart.conf" file from below, open it as text file and copy the content of "key.txt" between the last two rows "" " ".
Dowload the "smart.conf" file from below, open it as text file and copy the content of "key.txt" between the last two rows "
Save it and move it to your Android device memory.
Connect your Android device via usb cable to the Windows PC. Enable "USB tethering" on Android (Settings --> Wireless and Networks --> Tethering) and wait untill Windows installs drivers if you need those. Click yes on Windows request to "Allow your PC to be discoverable by other PCs and devices on this network" if it appears.
Now open "Network connections" as above. Then select the "Remote NDIS" network adapter, right click on it and open "Properties". Double click on "Internet Protocol Version 4 (TCP/IPv4)" and set IP as "192.168.42.128", Subnet mask as "255.255.255.0" and Gateway as "192.168.42.129". Click OK and exit.

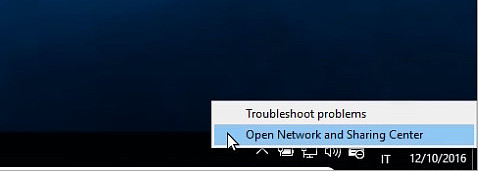
Check in "Open Network and Sharing Center" (right click on the small Monitor icon in system tray and open "Open Network and Sharing Center") under "View your active networks" that the network which corresponds to the "Remote NDIS" adapter is "private" and not "public".
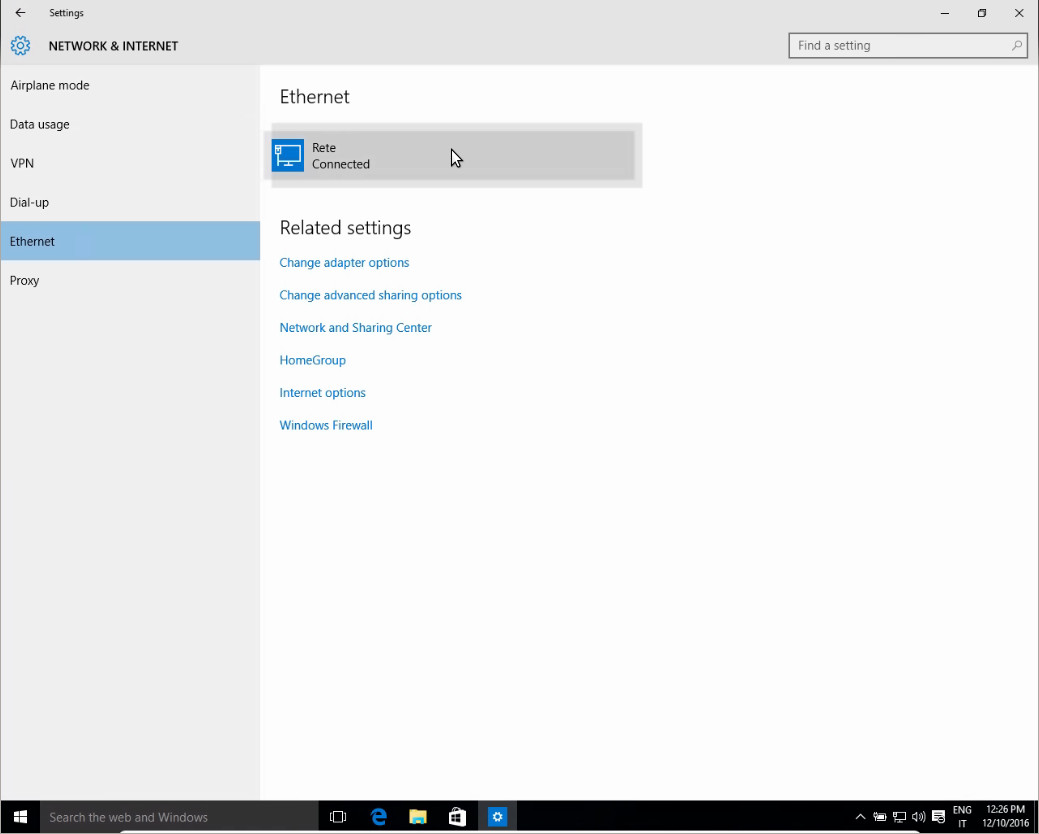
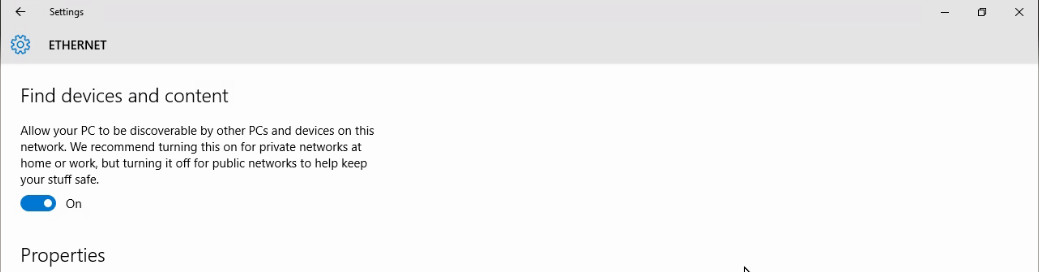
If it is "public", left click on Start Menu flag (left bottom corner on the desktop), select "Settings", then "Network & Internet", then "Ethernet", select from the right column the ethernet connection that you want to change, then set to "on" the first option "Allow your PC to be discoverable by other PCs and devices on this network...".


Disconnect the USB cable.
Install from Google Play Store (or from above) the app "OpenVPN for Android" on your device. Finally open "OpenVPN for Android" and in global "settings" uncheck the option "Reconnect on network change". Then import from the top right icon the file "smart.conf" you had saved earlier. Save the new created profile and later from pencil icon go to "Routing" tab: there select "Use default Routing" in IPv4 menu and exit. Optionally create an "OpenVPN for Android" widget on your home screen that links to your profile. Finished.
RUNNING
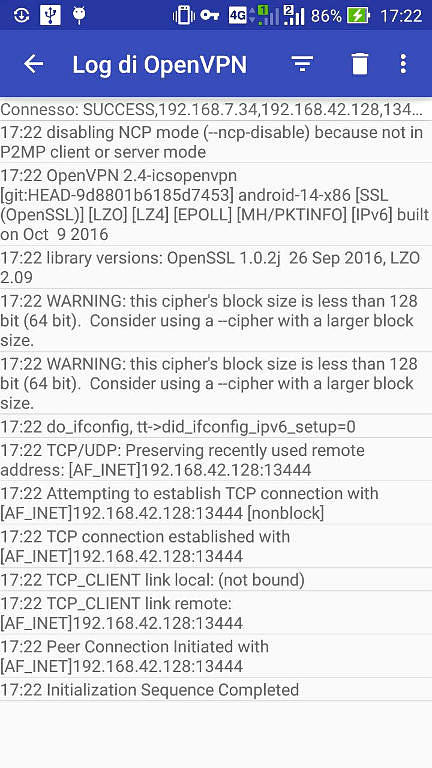
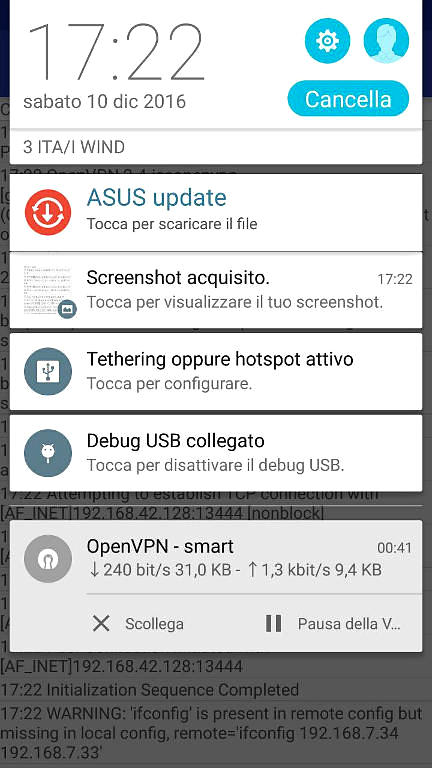
Now, to connect your smartphone to internet via lan connection of your Windows PC just follow the following steps. Double click on "OpenVPN GUI" on your Windows desktop (make sure you run the program "as administrator" from right click if you have not already configured it as we said above). On Windows system tray, right click on the OpenVPN icon and press connect. Finally connect your Android device via usb cable to your PC, enable "USB tethering" in "Settings --> Wireless and Networks --> Tethering" on Android, then temporarily enable your phone data connection (2G/3G/4G) and tap on your "OpenVPN for Android" widget (or on the profile name in "OpenVPN for Android" app). If you read "success" somewhere at the top (log screen), you're OK.
IMPORTANTE: dentro de los ajustes de la app OpenVPN para android hay que quitar la casilla "reconectar en cambio de red", si no la quitamos al deshabilitar datos moviles se desconecta la VPN.
You can then disable phone data connection if you use Browsers such as Chrome or many other app such as WhatsApp. Anyway some apps (as Gmail, Download etc.) check if a wireless connection (WIFI or 3G) is present at boot otherwise they will not start or work, so they require at least data connection enabled to work. Nevertheless all internet traffic is always routed over the usb connection and therefore your data plan is safe. Furthermore, for the same reason, your body is subjected to a considerably lower electromagnetic pollution. Enjoy!
Note 1: this tutorial assumes that the IP address of your smartphone in USB tethering mode is 192.168.42.129, as it should be. Check this by typing "netcfg" in "android terminal" app of PlayStore and eventually change it accordingly above, together with the 192.168.42.128 address of the "Remote NDIS" interface.
Note 2: If after a smartphone (or tablet) restart the "Remote NDIS" network name changes, set the new one as "private network" again as we explained above, otherwise it will not work anymore.
Note 3: with slight modifications this guide should also work with Windows versions lower than 10.


Comentarios